How to Enable Secure Boot to Play Battlefield 2042 on Windows
Readers help support Windows Report. We may get a commission if you buy through our links.
Read our disclosure page to find out how can you help Windows Report sustain the editorial team. Read more
A recent Battlefield 2042 update (v8.8.0) now requires Secure Boot to be enabled on your system. This is a mandatory anti-cheat measure, and if Secure Boot on your Windows PC is off, you may encounter errors when launching the game. Here’s how to check your system and enable Secure Boot in just a few steps even if you’re not a geek and know everything about a Windows 11 (or Windows 10) PC.
Check If Secure Boot Is Already Enabled
Before jumping into BIOS settings, it’s smart to verify your current Secure Boot status in Windows.
Steps to check Secure Boot in Windows:
- Press
Windows + R, typemsinfo32, and hit Enter. - In the System Information window:
- Look for BIOS Mode (must say
UEFI). - Look for Secure Boot State (must say
On).
- Look for BIOS Mode (must say
If Secure Boot is already enabled and you’re still having trouble, your configuration may be incomplete. In that case, check this guide for when Secure Boot is enabled but not active.
How to Enable Secure Boot for Battlefield 2024?
Below are simplified instructions for enabling Secure Boot on most systems. The BIOS interface may vary slightly depending on your brand. We also recommend taking a look at the next section that helps you prepare for enabling secure boot, as it may require some preliminary actions to be taken.
This method should work universally for a lot of laptop and motherboard manufacturers, like ASUS, MSI, Gigabyte, Dell, HP, and Lenovo, but make sure you double-check what key to press to enter the BIOS mode for your machine.
Enable secure boot for Battlefield step-by-step:
Time needed: 6 minutes
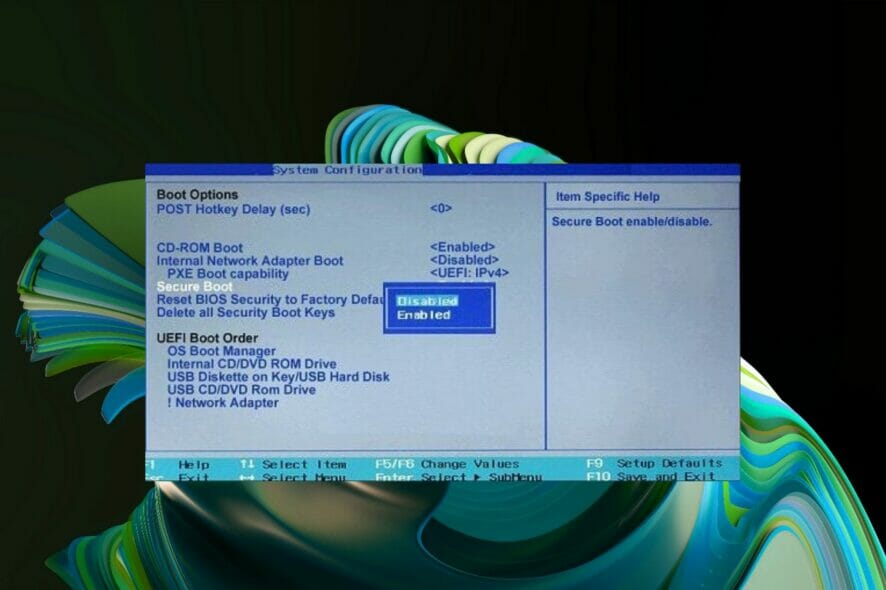
- Enter BIOS/UEFI
– Restart your PC and press the BIOS key repeatedly (usually
DEL,F2, orF10) when your manufacturer’s logo appears. - Switch to UEFI Mode
– Find Boot Mode or CSM settings and change them to UEFI.
– On some systems, this might be called “Windows UEFI Mode” or “UEFI Only”. - Disable Legacy/CSM
– Locate “Launch CSM” or “Legacy Boot” and set it to Disabled
- Enable Secure Boot
– Go to the Security or Boot tab.
– Find “Secure Boot Control” or “Secure Boot” and change it to Enabled. - Load Factory Keys if Prompted
– If Secure Boot is greyed out, find an option like Restore Factory Keys or Enroll All Factory Keys.
– This switches Secure Boot from Setup Mode to Standard/User Mode. - Save & Exit
– Press
F10or go to the Exit tab and choose “Save Changes and Exit”.
– Your PC will reboot with Secure Boot enabled.
On some systems like HP and Lenovo, Secure Boot may appear greyed out until you follow those exact steps. If that’s your case, refer to this quick fix for Secure Boot greyed out in Windows 11.
Prerequisites Before Enabling Secure Boot
Secure Boot only works under the right system conditions. Make sure you meet these requirements:
1.UEFI Boot Mode Must Be Enabled
- Your BIOS Mode must be UEFI, not Legacy or CSM.
- You can check your disk partition style in Disk Management → Disk Properties → Volumes tab.
- If it’s MBR, you’ll need to convert it to GPT using the
MBR2GPTtool or reinstall Windows in UEFI mode.
If you’re unsure about UEFI status or cannot access BIOS, follow this method to enable Secure Boot without BIOS access.
2. TPM 2.0 Recommended
- Press
Windows + R, typetpm.msc, and hit Enter. - If TPM is not active, enable fTPM (AMD) or PTT (Intel) in your BIOS under Security settings.
3. Disable Legacy/CSM Mode
- In your BIOS, locate “CSM” or “Legacy Boot” and set it to Disabled.
- This setting is often a blocker for Secure Boot on Gigabyte, ASUS, and MSI boards.
Final Check: Is Secure Boot Active?
After rebooting:
- Open the Run dialog (
Windows + R), typemsinfo32, and hit Enter. - Verify that:
- BIOS Mode = UEFI
- Secure Boot State = On
If both are correct, you’re good to launch Battlefield 2042. The Secure Boot requirement will no longer block you from playing.
Troubleshooting Tips
- Still Off? Go back to BIOS and check if the Secure Boot setting reverted or if the disk is still on MBR.
- BitLocker Users: If you had drive encryption active, BIOS changes might prompt for a BitLocker recovery key. Make sure you have it ready.
- Older PCs: If Secure Boot doesn’t appear at all, check if your BIOS is updated and the motherboard supports UEFI (post-2012).
Battlefield 2042’s latest anti-cheat system requires Secure Boot to be active on your system. Thankfully, enabling it is a one-time setup that only takes a few minutes. Once done, your PC becomes not just compliant for Battlefield, but more secure overall.
FAQs
Only if your Windows is installed in Legacy/MBR mode. Otherwise, a quick BIOS change is enough.
No. Secure Boot only runs at startup. It doesn’t affect gameplay, FPS, or app behavior.
Yes, but Battlefield 2042 will likely fail to launch until it’s re-enabled.
If it’s an older PC or BIOS, you may not have UEFI firmware. Check for BIOS updates or consider playing on a newer system.