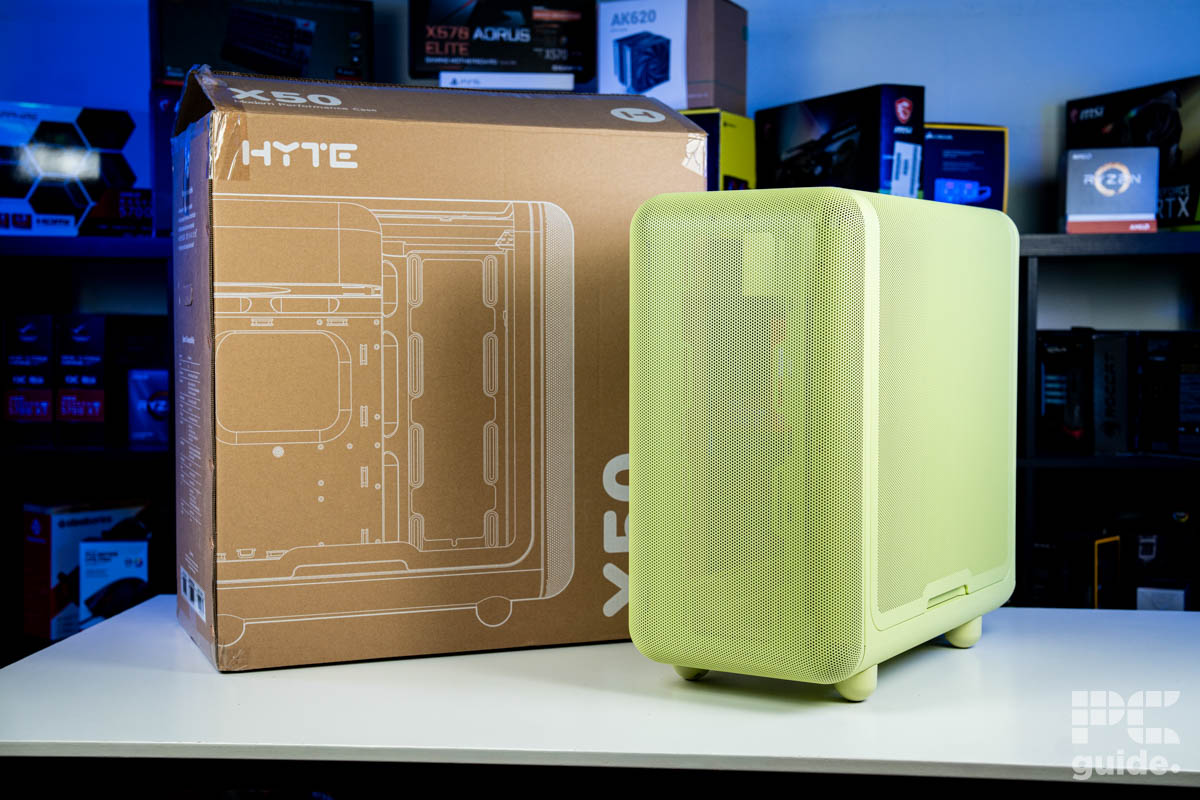
Hyte X50 review: unique, stylish, performance-first design
Announced back at Computex 2025, Hyte showed off a rainbow of colors for the new X50 PC case. Coming in two variants – the air and standard – you get the choice to showcase your build through a full glass panel or continue the mesh aesthetic all the way around.
With a load of rails for fans and panels full of holes, there’s plenty of opportunity to make it a case suited for airflow. But being the best PC case takes more than just looks, so we put it to the test in our review.

Specifications
- Type: Mid-Tower
- Motherboard support: E-ATX (up to 10.6”), ATX, MATX, ITX
- Included fans: None
- Fan support: 10x (10/7x 120mm, 0/3x 140mm)
- Radiator compatibility: 2x 360mm (1x70mm, 1x 105mm thick)
- Storage bays: 2x 2.5” (SSD), 1x 3.5” (HDD)
- CPU cooler clearance: 170mm
- GPU clearance: 430mm Length, 160mm Height
- Expansion slots: 7
- PSU support: Up to 223mm
- Dimensions (LxWxH): 510 x 485 x 255mm
- Weight: ~11.7kg
- Materials: 1mm Thick Steel, ABS
- Front I/O: 1x USB 3.2 Gen 2×2 Type-C, 2x USB 3.2 Gen 1×1 Type A, 1x power switch with LED, and 1x 3.5mm Combo Jack
Show more
What We Think
The Hyte X50 is clearly a case designed with visual impact in mind. Its curved panels, vibrant color options, and playful touches like the angled feet make it both unique and eye-catching. However, that style comes at a premium – and the lack of included fans limits your color choices to Hyte’s offerings, which can make the build feel a bit restrained. On the plus side, the case is well-built, offers plenty of open space for easy assembly, and delivers a final result that’s genuinely a joy to look at.
Reasons to Buy
- Innovative and impressive curved panels
- Generally soft and nice design
- High-quality build, that’s simple to work in
- Plenty of fun colors to pick from
- A lot of fan mount places
Reasons to Avoid
- No fans included
- The PSU chamber is a bit tight for space
- Storage mounting is a bit limiting
- Doesn’t hide cables effectively, and management is a bit simple
Main features and specifications
The Hyte X50 is certainly an eye-catching design of a PC case. With curved panels, smooth surfaces, more cutesy design, it has a load of colorways to choose between and is a more unique option. Pushing the limits of production and what a chassis is capable of, there’s a lot to enjoy on it.
There are two versions of the case, the X50 and the X50 Air; the latter swaps the glass side panel for a mesh panel instead and limits the colors to black and white. Whereas the standard X50 adds an extra four options: wild cherry, matcha, strawberry milk, and taro milk. So here’s a look at its specs and features listed below.
| Specification | Hyte X50 |
|---|---|
| Type | Mid-Tower |
| Motherboard support | E-ATX (up to 10.6”), ATX, MATX, ITX |
| Included fans | None |
| Fan support | 10x (10/7x 120mm, 0/3x 140mm) |
| Radiator compatibility | 2x 360mm (1x70mm, 1x 105mm thick) |
| Case drive bays | 2x 2.5” (SSD), 1x 3.5” (HDD) |
| CPU cooler clearance | 170mm |
| GPU clearance | 430mm Length, 160mm Height |
| Expansion slots | 7 |
| PSU support | Up to 223mm |
| Dimensions (LxWxH) | 510 x 485 x 255mm |
| Weight | ~11.7kg |
| Materials | 1mm Thick Steel, ABS |
| Front I/O | 1x USB 3.2 Gen 2×2 Type-C, 2x USB 3.2 Gen 1×1 Type A, 1x power switch with LED, and 1x 3.5mm Combo Jack |
Pricing
For the cost of the case, it has a variety of prices depending on where you look, especially since Hyte has suspended its shipments into the US from its own store. It is listed for $159.99 on its store, but on Amazon, it is priced at $171.99 as of writing. In the UK, you can pick it up for £149.90.
It’s certainly a premium price to pay for what appears, at first glance, to be a fairly standard mid-tower ATX case. Especially with no included fans, and something like the 4000D RS coming in at $114.99, the NZXT H5 Flow at $94.99, or the Lian Li LANCOOL 217 at $119.99. However, the X50 pushes what’s possible in terms of builds as it adds curved glass and mesh panels, and innovative manufacturing that certainly makes it more expensive.
Previous
Next
Outside
With the specs in mind and an overview of what the case has to offer, now I’ll go over the closer details. Starting from the unboxed case and looking over the outside of it.
Front
From the front, the case looks fairly simple, with nothing immediately striking – except for the fact that it’s made from a single, rounded panel. The full-metal mesh is crafted from one sheet of material, giving it a refined finish while also providing effective dust control. The result is a smooth, elegant front with two rounded feet extending slightly below.
The panel is also easy to remove, simply sliding off from a hidden groove underneath. Multiple sockets hold it securely in place while concealing the fan mount rails behind it. These rails allow you to mount fans either flush with the case or with a 30mm offset, giving a bit more clearance if needed.
Previous
Next
Rear
Looking at the back of the case, there are numerous cutouts and mounts throughout. At the top sits a gold-colored Hyte logo, positioned next to the PSU opening, which in this model is located at the top of the main chamber. Below that is the I/O cutout, accompanied by a single 120mm fan mount.
The rear panel also features twisted metal slits that provide airflow across the entire back. This includes the PCIe slot covers, which sit slightly recessed from the main panel and are secured with screws for reuse. Interestingly, there are also outward-facing metal tie-down arcs along the left side, offering additional cable management options for keeping your desk setup clean and organized.

Hyte X50 – Matcha rear PSU mount, Image by PC Guide

Hyte X50 – Matcha rear, Image by PC Guide
Previous
Next
Sides
Both sides of the case are covered by single, sweeping panels that extend from top to bottom – a feature that takes more engineering than you might think. The right side features a large tempered glass panel that rises higher than those on many other cases, while the left side copies the design of the front panel with a curved mesh that spans the full height.
Removing the panels is simple. Both have slots at the bottom that allow you to lift them off, with tabs at the top and bottom that snap into place. This secure design holds the panels firmly without the need for screws, making access to the interior quick and easy.
Previous
Next
Top
With so much of the case covered by panels and their sweeping curves, much of the top is either glass or mesh. Since the glass takes up most of the space, the front and left side panels occupy the rest, leaving only a slim strip of metal for the I/O. This includes a power button, two USB Type-A ports, one USB Type-C port, and a 3.5mm combo audio jack.

Hyte X50 – Matcha front IO, Image by PC Guide

Hyte X50 – Matcha top down, Image by PC Guide
Previous
Next
Bottom
Underneath, the corners are accented with small, rounded “paw” feet. While they may not be immediately noticeable, they add a playful touch that complements the case’s overall rounded aesthetic.
In the center of the bottom panel, there are three fan mounting holes, one of which cuts through one of the “toe beans” on the feet. The X50 includes a magnetic mesh panel to cover this area – the only separate mesh panel on the case. However, it can feel a bit loose and tricky to keep properly aligned.

Inside
Taking off the panels, I take a look at what’s inside the case, with a closer look at the features you can use to build, and the general layout of it.
Main chamber
Looking into the main chamber, the PSU shroud immediately catches the eye. Unlike the typical bottom placement, the X50 opts to place the PSU in the top-left corner, slightly encroaching into the upper space – an unusual but striking design choice.
Along the front and side, large columns of fan rails and open space lead straight to the front mesh, providing plenty of room for radiators and additional fans. The bottom panel also features a recessed area that can accommodate three individual fans, while the back has a single dedicated fan mount.
The motherboard tray dominates the chamber. ATX standoffs are pre-installed, with clear indicators for other motherboard sizes, making installation straightforward and eliminating guesswork. Around the tray, there are generous cutouts for cable management, including a large opening at the bottom, along the right side, and at the top, allowing easy routing of cables for a clean build.
Previous
Next
Back chamber
Once opened, the back chamber occupies just over half the length of the case. With the front portion taken up by fan mounts, most of the usable space is behind the motherboard tray. The power supply sits at the top in the main chamber, keeping it conveniently out of the way.
On the left side, pre-installed Velcro straps run down the length of the chamber to manage power cables efficiently. At the bottom, a storage sled – secured with a single screw – supports up to three drives, complements the case’s curved design, and houses the accessories box straight out of the box.
Rubber grommets along the back help conceal cables and guide them neatly to the front. Below that, the front I/O cables pass through a dedicated gap, making routing simple and organized.
Previous
Next
Build experience
Building in this case was relatively quick and straightforward. At over 11kg, it’s on the heavier side, but removing it from the box and packaging was easy. Once the panels are off, the interior opens up, providing easy access for installation.
While unpacking, I noticed the instruction manual wasn’t included, so I had to reference it online for a few details. On the plus side, the screws are clearly labeled in reusable bags, making it easy to select the correct ones and avoid stripping them or the standoffs. Though less environmentally friendly, the screws are also packaged in single-use plastics inside the reusable bags for some reason.
The spacious main chamber made mounting the motherboard straightforward. However, the absence of a middle standoff makes installation easier with the case lying flat rather than upright. There are plenty of spots for FA12 fans – we were sent two packs of the color-matched FA12s – which allowed me to fill the bottom and side panels to optimize airflow into the case and directly toward the GPU.
Previous
Next
The FA12 fans conveniently came with daisy-chain cables, meaning you only need a single header to power multiple fans, rather than using several headers or a separate fan hub. Installing the offset radiator at the front was straightforward, as it can be removed for easier mounting, eliminating the need to hold it in place while screwing it down. One minor issue was that one of the fan holes sits inside one of the feet underneath, making it hard for my screwdriver to reach – which can be difficult during the build process.
Sliding in the power supply was similarly hassle-free, thanks to the open layout. With a 210mm PSU, space was a bit tight, and I wasn’t able to use the Velcro straps at the top, but I made use of the ones along the side and added the included straps to tidy up the cables.
The storage area proved more frustrating. Installing an SSD into the small cage is difficult once the cage is mounted. Cabling it and then securing the cage sometimes caused the connections to loosen, requiring a rework and some blind fumbling.
Back here, there’s limited room for additional hardware. With two hubs to manage for the AIO and fans, the area became cramped, and cable management could benefit from extra mounting points.
Previous
Next
As for the rest of the routing cables, it was quite nice to have grommets spanning the whole spine and top. It meant I could direct each cable very close to where it needed to be. Once again, though, my motherboard was on the larger side, and a bit larger than the 10.6” EATX the case supports, so it wasn’t a problem to cable, but it does overlap with the side fans and could interfere with airflow, but most probably won’t be installing an MSI MEG X870E Godlike X Edition into the case.
Once that was in, all that was left was the GPU, which has plenty of room to fit in, even the huge ROG Astral RTX 5090. Though it did take me a few goes to slot it in since the IO prongs of the GPU kept sliding to the outside, so the panel might be a bit too close for quick, easy installation. There is also no integrated support, and no clear space underneath to use a standing one, leaving it sagging.
Fans
By default, the Hyte X50 doesn’t come with any fans pre-installed, even in the Air version. Because of the case’s unique colors, finding matching fans isn’t easy. For the non-black or non-white variants, Hyte is essentially the only source for perfectly color-matched sets.
For the X50, Hyte offers FA12 120mm fans. These ABS fans feature fluid dynamic bearings, a maximum speed of 1,500 RPM, and an airflow rating of 72 CFM. Sold in sets of four, the package includes screws for each fan and a splitter cable, making it much easier to power multiple fans from a single header.
Design-wise, the fans complement the case with smooth edges and curved blades, fitting well in the intended locations—one at the back, with the rest along the side or bottom. The Matcha edition stands out for its white sleeved cables, which not only look clean but also coordinate with the case’s color scheme.
A four-pack retails for $49.99, which isn’t unreasonable for four quality fans. However, it does lock you into a single color option, limiting flexibility for matching other components in your build. The white cables, in particular, push you toward a lighter color palette rather than mixing with darker components, as I discovered during testing.

FA12 Matcha fan boxes, Image by PC Guide

FA12 Matcha fan frront, Image by PC Guide

FA12 Matcha fan rear, Image by PC Guide

FA12 Matcha fan side, Image by PC Guide

FA12 Matcha fans and box contents, Image by PC Guide

FA12 Matcha fan angled, Image by PC Guide

FA12 Matcha fan cable, Image by PC Guide

FA12 Matcha fan connectors, Image by PC Guide

Hyte X50 – Matcha beside fans, Image by PC Guide

Hyte X50 – Matcha back fan rear, Image by PC Guide

Hyte X50 – Matcha back fan, Image by PC Guide

Hyte X50 – Matcha front fans, Image by PC Guide

Hyte X50 – Matcha front left angled, Image by PC Guide

Hyte X50 – Matcha glass side and fans, Image by PC Guide

Hyte X50 – Matcha left side fans, Image by PC Guide
Previous
Next
Performance
With the system up and running, I put it through our testing lab to see how well it performed under load. Utilizing Furmark 2 and pinning the 9800X3D CPU and RTX 5090 GPU, it puts it under the maximum power draw and heat load to see how well it’s handled.
With an AIO cooler mounted in the front, and a whole set of fans on the side and bottom, there certainly was plenty of air rushing in through the case. In reality, it’s probably too much and can interfere with all the intake fans, possibly creating turbulence inside. The bottom rail does mean the GPU gets a fresher supply, though, instead of getting the warm air coming from the AIO, giving it a better cooling capability with a fresher supply.

During the 20-minute test, the CPU reached a peak of 95°C, the GPU to 67°C, and the motherboard MOS capacitors rose to 54°C. Considering the abnormal load, it’s keeping the motherboard and GPU in check while the processor is pinned at its safe levels and not going above.
This is under the default fan mode set on the motherboard, as the fans are daisy-chained together and using the system fan headers on board. With the number of holes in the case and without a finer mesh, the fans don’t create any unpleasant sounds and do, in fact, manage to keep relatively quiet under the load.
Specifications
- Type: Mid-Tower
- Motherboard support: E-ATX (up to 10.6”), ATX, MATX, ITX
- Included fans: None
- Fan support: 10x (10/7x 120mm, 0/3x 140mm)
- Radiator compatibility: 2x 360mm (1x70mm, 1x 105mm thick)
- Storage bays: 2x 2.5” (SSD), 1x 3.5” (HDD)
- CPU cooler clearance: 170mm
- GPU clearance: 430mm Length, 160mm Height
- Expansion slots: 7
- PSU support: Up to 223mm
- Dimensions (LxWxH): 510 x 485 x 255mm
- Weight: ~11.7kg
- Materials: 1mm Thick Steel, ABS
- Front I/O: 1x USB 3.2 Gen 2×2 Type-C, 2x USB 3.2 Gen 1×1 Type A, 1x power switch with LED, and 1x 3.5mm Combo Jack
Show more
Conclusion
The Hyte X50 is undeniably a striking PC case. Its gentle, curved design and wide variety of colorways make it an eye-catching chassis. Combined with solid performance, it emphasizes the importance of planning your build carefully – especially if you want to match the fans from Hyte or create a cohesive white-themed setup.
The case offers plenty of space in the main chamber, though the back can feel somewhat cramped, creating a mixed experience during assembly. Overall, however, the X50 is a well-designed, high-quality option that’s an excellent choice for builders who want a visually distinctive and functional case.